【wordpress教程】给博客添加说说功能和微语功能

[wm_kuang title="摘要"]当博客搭建起来后,只得要对博客进行功能上的优化和界面上的美化。这个“说说”功能,也就是类似于微博,一句话文章。更简单地可以说也像我们微信的朋友圈[/wm_kuang]

效果

[wm_wpbutton link="https://www.dujia520.cn/23137-2" target="blank" variation="blue"]说说功能[/wm_wpbutton]

教程开始

第一步:添加到functions.php里

//新建说说功能 
add_action('init', 'my_custom_init');
function my_custom_init()
{ $labels = array( 'name' => '说说',
'singular_name' => '说说',
'add_new' => '发表说说',
'add_new_item' => '发表说说',
'edit_item' => '编辑说说',
'new_item' => '新说说',
'view_item' => '查看说说',
'search_items' => '搜索说说',
'not_found' => '暂无说说',
'not_found_in_trash' => '没有已遗弃的说说',
'parent_item_colon' => '', 'menu_name' => '说说' );
$args = array( 'labels' => $labels,
'public' => true,
'publicly_queryable' => true,
'show_ui' => true,
'show_in_menu' => true,
'exclude_from_search' =>true,
'query_var' => true,
'rewrite' => true, 'capability_type' => 'post',
'has_archive' => false, 'hierarchical' => false,
'menu_position' => null,
'taxonomies'=> array('category','post_tag'),
'supports' => array('editor','author','title', 'custom-fields','comments') );
register_post_type('shuoshuo',$args);
}

第二步添加PHP文件

新建一个shuoshuo.php文件放到你正在使用的主题根目录里把下面代码放入。

<?php /*
    Template Name: 说说碎语
      */
    get_header(); ?>
<style type="text/css">
    #shuoshuo_content {
        background-color: #fff;
        padding: 10px;
        min-height: 500px;
    }
    /* shuo */
    body.theme-dark .cbp_tmtimeline::before {
        background: RGBA(255, 255, 255, 0.06);
    }
    ul.cbp_tmtimeline {
        padding: 0;
    }
    div class.cdp_tmlabel > li .cbp_tmlabel {
        margin-bottom: 0;
    }
    .cbp_tmtimeline {
        margin: 30px 0 0 0;
        padding: 0;
        list-style: none;
        position: relative;
    }
    /* The line */
    .cbp_tmtimeline:before {
        content: '';
        position: absolute;
        top: 0;
        bottom: 0;
        width: 4px;
        background: RGBA(0, 0, 0, 0.02);
        left: 80px;
        margin-left: 10px;
    }
    /* The date/time */
    .cbp_tmtimeline > li .cbp_tmtime {
        display: block;
        /* width: 29%; */
        /* padding-right: 110px; */
        max-width: 70px;
        position: absolute;
    }
    .cbp_tmtimeline > li .cbp_tmtime span {
        display: block;
        text-align: right;
    }
    .cbp_tmtimeline > li .cbp_tmtime span:first-child {
        font-size: 0.9em;
        color: #bdd0db;
    }
    .cbp_tmtimeline > li .cbp_tmtime span:last-child {
        font-size: 1.2em;
        color: #9BCD9B;
    }
    .cbp_tmtimeline > li:nth-child(odd) .cbp_tmtime span:last-child {
        color: RGBA(255, 125, 73, 0.75);
    }
    div.cbp_tmlabel > p {
        margin-bottom: 0;
    }
    /* Right content */
    .cbp_tmtimeline > li .cbp_tmlabel {
        margin: 0 0 45px 65px;
        background: #9BCD9B;
        color: #fff;
        padding: .8em 1.2em .4em 1.2em;
        /* font-size: 1.2em; */
        font-weight: 300;
        line-height: 1.4;
        position: relative;
        border-radius: 5px;
        transition: all 0.3s ease 0s;
        box-shadow: 0 1px 2px rgba(0, 0, 0, 0.15);
        cursor: pointer;
        display: block;
    }
    .cbp_tmlabel:hover {
        /* transform:scale(1.05); */
        transform: translateY(-3px);
        z-index: 1;
        -webkit-box-shadow: 0 15px 32px rgba(0, 0, 0, 0.15) !important
    }
    .cbp_tmtimeline > li:nth-child(odd) .cbp_tmlabel {
        background: RGBA(255, 125, 73, 0.75);
    }
    /* The triangle */
    .cbp_tmtimeline > li .cbp_tmlabel:after {
        right: 100%;
        border: solid transparent;
        content: " ";
        height: 0;
        width: 0;
        position: absolute;
        pointer-events: none;
        border-right-color: #9BCD9B;
        border-width: 10px;
        top: 4px;
    }
    .cbp_tmtimeline > li:nth-child(odd) .cbp_tmlabel:after {
        border-right-color: RGBA(255, 125, 73, 0.75);
    }
    p.shuoshuo_time {
        margin-top: 10px;
        border-top: 1px dashed #fff;
        padding-top: 5px;
    }
    /* Media */
    @media screen and (max-width: 65.375em) {
        .cbp_tmtimeline > li .cbp_tmtime span:last-child {
            font-size: 1.2em;
        }
    }
    .shuoshuo_author_img img {
        border: 1px solid #ddd;
        padding: 2px;
        float: left;
        border-radius: 64px;
        transition: all 1.0s;
    }
    .avatar {
        -webkit-border-radius: 100% !important;
        -moz-border-radius: 100% !important;
        box-shadow: inset 0 -1px 0 #3333sf;
        -webkit-box-shadow: inset 0 -1px 0 #3333sf;
        -webkit-transition: 0.4s;
        -webkit-transition: -webkit-transform 0.4s ease-out;
        transition: transform 0.4s ease-out;
        -moz-transition: -moz-transform 0.4s ease-out;
    }
    .zhuan {
        transform: rotateZ(720deg);
        -webkit-transform: rotateZ(720deg);
        -moz-transform: rotateZ(720deg);
    }
    /* end */
</style>
</head>
<body>
<div id="primary" class="content-area" style="">
    <main id="main" class="site-main" role="main">
        <div id="shuoshuo_content">
            <ul class="cbp_tmtimeline">
                <?php query_posts("post_type=shuoshuo&post_status=publish&posts_per_page=-1");if (have_posts()) : while (have_posts()) : the_post(); ?>
                <li> <span class="shuoshuo_author_img"><img src="https://www.XXXX.cn/wp-content/uploads/2017/03/5201314_avatar-96x96.jpg" class="avatar avatar-48" width="48" height="48"></span>
                    <a class="cbp_tmlabel" href="javascript:void(0)">
                        <p></p>
                        <p><?php the_content(); ?></p>
                        <p></p>
                        <p class="shuoshuo_time"><i class="fa fa-clock-o"></i>
                            <?php the_time('Y年n月j日G:i'); ?>
                        </p>
                    </a>
                    <?php endwhile;endif; ?>
                </li>
            </ul>
        </div>
    </main>
    <!-- .site-main -->
</div>
<script type="text/javascript">
    $(function () {
        var oldClass = "";
        var Obj = "";
        $(".cbp_tmtimeline li").hover(function () {
            Obj = $(this).children(".shuoshuo_author_img");
            Obj = Obj.children("img");
            oldClass = Obj.attr("class");
            var newClass = oldClass + " zhuan";
            Obj.attr("class", newClass);
        }, function () {
            Obj.attr("class", oldClass);
        })
    })
</script>
<?php get_sidebar(); ?>
<?php get_footer();?>


上面代码第147行处是你头像的地址,修改即可!

说明

如果只想单纯的写文字的话,可以把第150行代码中的<?php the_content(); ?>改成<?php the_title(); ?>,这样发表说说只要填写标题就可以了,查找起来也比较方便。如果用<?php the_content(); ?>,那么发表说说的时候标题和内容要写成一样,方便查找,如果只填写内容,那么在后台查看说说的时候,显示的列表全是无标题。

第三步添CSS样式

/* 说说css代码 */
   #shuoshuo_content {
       background-color: #fff;
       padding: 10px;
       min-height: 500px;
   }
   //说说
   body.theme-dark .bsy_timeline::before {
       background: RGBA(255, 255, 255, 0.06);
   }
   ul.bsy_timeline {
       padding: 0;
   }
   div class.bsy_tmlabel > li .bsy_tmlabel {
       margin-bottom: 0;
   }
   .bsy_timeline {
       margin: 30px 0 0 0;
       padding: 0;
       list-style: none;
       position: relative;
   }
   //时间
   .bsy_timeline > li .bsy_tmtime {
       display: block;
       max-width: 70px;
       position: absolute;
   }
   .bsy_timeline > li .bsy_tmtime span {
       display: block;
       text-align: rightright;
   }
   .bsy_timeline > li .bsy_tmtime span:first-child {
       font-size: 0.9em;
       color: #bdd0db;
   }
   .bsy_timeline > li .bsy_tmtime span:last-child {
       font-size: 1.2em;
       color: #9bcd9b;
   }
   .bsy_timeline > li:nth-child(odd) .bsy_tmtime span:last-child {
       color: rgba(255, 125, 73, 0.75);
   }
   div.bsy_tmlabel > p {
       margin-bottom: 0;
   }
   //说说内容
   .bsy_timeline > li .bsy_tmlabel {
       margin: 0 0 45px 65px;
       background: #9bcd9b;
       color: #fff;
       padding: .8em 1.2em .4em 1.2em;
       line-height: 1.4;
       position: relative;
       border-radius: 8px;
       transition: all 0.3s ease 0s;
       box-shadow: 0 1px 2px rgba(0, 0, 0, 0.15);
       display: block;
   }
   .bsy_tmlabel:hover {
       transform: translateY(-3px);
       z-index: 1;
       -webkit-box-shadow: 0 15px 32px rgba(0, 0, 0, 0.15) !important
   }
   .bsy_timeline > li:nth-child(odd) .bsy_tmlabel {
       background: rgba(255, 125, 73, 0.75);
   }
   //三角
   .bsy_timeline > li .bsy_tmlabel:after {
       rightright: 100%;
       border: solid transparent;
       content: " ";
       height: 0;
       width: 0;
       position: absolute;
       pointer-events: none;
       border-right-color: #9bcd9b;
       border-width: 10px;
       top: 10px;
   }
   .bsy_timeline > li:nth-child(odd) .bsy_tmlabel:after {
       border-right-color: rgba(255, 125, 73, 0.75);
   }
   .shuoshuo_time {
       margin-top: 10px;
       border-top: 1px dashed #eaeaea;
       padding-top: 6px;
   }
   //头像
   @media screen and (max-width: 65em) {
       .bsy_timeline > li .bsy_tmtime span:last-child {
           font-size: 1.3em;
       }
   }
   .author_tou img {
       border: 1px solid #ccc;
       padding: 2px;
       float: left;
       border-radius: 8px;
       transition: all 1.0s;
   }
 .zhuan {
        transform: rotateZ(720deg);
        -webkit-transform: rotateZ(720deg);
        -moz-transform: rotateZ(720deg);
    }

把以上css代码添加到 style.css 文件里

使用方法

进入 WordPress 后台,新建“说说”页面,模版选择之前创建的“说说”模版,之后就可以发表说说了。

直接下载

[wm_gzh keyword="关键字" key="dujia520"] 下载地址 https://www.lanzous.com/i9vlo6b[/wm_gzh]

常用的几种网页跳转,图片跳转,自动跳转页面代码分享

[wm_notice]可以在html代码的部分加上这样的域名跳转代码:[/wm_notice]

域名页面显示几秒钟之后跳转

<meta http-equiv="refresh" content="3; url=http://将这里改成要跳转的域名";>

不隐藏域名跳转之后的地址

<html> <body> <meta http-equiv="refresh" content="0.1;url=将这里改成要跳转的域名"> </body> </html>

可隐藏域名跳转之后的地址

<html> <frameset framespacing="0" border="0" rows="0" frameborder="0"> <frame name="main" src="将这里改成要跳转的域名" scrolling="auto" noresize> </frameset> </html>

定时的域名跳转代码

<meta http-equiv="refresh" content="3;rul=http://将这里改成要跳转的域名";>

此代码可以让网页在一定的时间内,跳转到另外一个网页上,其中content=” 为跳转前停暂的秒数,rul= 为跳转的域名

域名要在客户端跳转,可以这样

<script language="javascript" type="text/javascript">window.location="http://将这里改成要跳转的域名";;</script>

域名在服务器端跳转

Response.Redirect(http://将这里改成要跳转的域名)Response.End

图片跳转代码

<a href="将这里改成要跳转的域名" target="_blank"><img src="图片跳转" style="width:100%"></a>

最新的网站鼠标点击爆裂特效

西瓜君今天在@夏末浅笑博客大佬网站突然发现有一个好玩的,我现在也就分享给大家,这个特效点击后有爆炸的感觉额!该代码通用任何PC移动站,mip和amp不适用,因为是用js实现的,先来看看效果图

效果图

网站特效代码

方法一:添加如下js代码或者直接远程调用(js –https://aliyun.ccswust.org/Js/dianji-2020/dianji-2020.js)
方法二、前台公共模板里面添加canvas元素,如footer底部文件

<canvas class="fireworks" style="position:fixed;left:0;top:0;z-index:99999999;pointer-events:none;"></canvas>

相信大家看了上面的方法应该都会操作吧,西瓜君在这里给大家提供最简单的,只需要在公共位置添加这两句代码即可,和上面的方法是一样的。

<canvas class="fireworks" style="position:fixed;left:0;top:0;z-index:99999999;pointer-events:none;"></canvas><script type="text/javascript" src="https://aliyun.ccswust.org/Js/dianji-2020/dianji-2020.js"></script>

VIEU配置方法

进入后台—外观—主题设置—自定义代码—自定义JS代码

然后复制下面的这段代码即可

<canvas class="fireworks" style="position:fixed;left:0;top:0;z-index:99999999;pointer-events:none;"></canvas>
<script type="text/javascript" src="https://aliyun.ccswust.org/Js/dianji-2020/dianji-2020.js"></script>


【wordpress代码】纯代码实现压缩优化网站速度

使用方法

将以下代码复制到functions.php文件中,有的主题在functions-theme.php文件中。

代码

/*
WordPress网页代码压缩
*/
function wp_compress_html(){
    function wp_compress_html_main ($buffer){
        $initial=strlen($buffer);
        $buffer=explode("", $buffer);
        $count=count ($buffer);
        for ($i = 0; $i <= $count; $i++){
            if (stristr($buffer[$i], '')) {
                $buffer[$i]=(str_replace("", " ", $buffer[$i]));
            } else {
                $buffer[$i]=(str_replace("\t", " ", $buffer[$i]));
                $buffer[$i]=(str_replace("\n\n", "\n", $buffer[$i]));
                $buffer[$i]=(str_replace("\n", "", $buffer[$i]));
                $buffer[$i]=(str_replace("\r", "", $buffer[$i]));
                while (stristr($buffer[$i], '  ')) {
                    $buffer[$i]=(str_replace("  ", " ", $buffer[$i]));
                }
            }
            $buffer_out.=$buffer[$i];
        }
        $final=strlen($buffer_out);   
        $savings=($initial-$final)/$initial*100;   
        $savings=round($savings, 2);   
    return $buffer_out;
}
ob_start("wp_compress_html_main");
}
add_action('get_header', 'wp_compress_html');

然后刷新网页就OK了。那么如果我们要一些地方不要压缩,该如何做呢?

格式

<!--wp-compress-html--><!--wp-compress-html no compression-->


【WordPress教程】禁止纯英文和日文的评论


将一下代码复制到functions.php中即可。提示:只要是全局调用文件就可以啦

代码

// 屏蔽纯英文评论和纯日文
function refused_english_comments($incoming_comment) {
$pattern = '/[一-龥]/u';
// 禁止全英文评论
if(!preg_match($pattern, $incoming_comment['comment_content'])) {
wp_die( "您的评论中必须包含汉字!" );
}
$pattern = '/[あ-んア-ン]/u';
// 禁止日文评论
if(preg_match($pattern, $incoming_comment['comment_content'])) {
wp_die( "评论禁止包含日文!" );
}
return( $incoming_comment );
}
add_filter('preprocess_comment', 'refused_english_comments');

评论提交时,通过正则表达式匹配评论内容,如果评论是纯英文或者包含了日文,则跳转到提示页面。

【wordpress代码】纯代码实现文章标题自动拼音别名


大家好!今天又是特别的一天,今天给大家介绍文章标题自动拼音别名,分为插件和纯代码实现此功能,下面我给大家都介绍下,纤细说下纯代码如何实现。

wordpress标题别名的插件

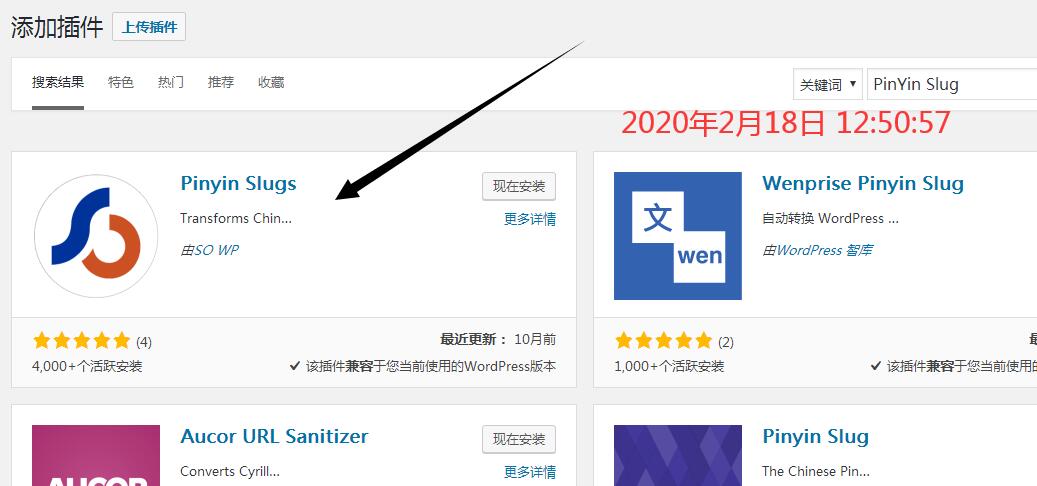
PinYin Slugs 插件
WordPress中文标题转换拼音插件。这个插件启用后,发布文章的“文章缩略名(Post Slugs)”会自动变成文章标题的汉语拼音,例如,如果你发布一篇文章,标题是“中文拼音”,通常情况下WordPress会自动产生一个缩名%e4%b8%ad%e6%96%87%e6%8b%bc%e9%9f%b3,如果你启用了“中文标题转换拼音插件”,则文章缩略名会变成zhongwenpinyin。这个缩写是在保存文章的时候产生的,因此你在发布文章前还可以对其进行修改,或者直接发布。这个插件对于以前已经存在的文章标题缩写是无效的,只对新文章有效,你可以通过删除旧文章后发布一篇新文章来自动产生这个拼音缩写。

插件安装截图

直接在插件后台安装即可

wordpress标题自动生成英文别名的代码

将以下任意一段代码添加到WordPress主题目录下的functions.php文件中,在最后一个?>标签前新添如下代码并保存。如果没有?>标签,则直接加到最后面。

百度翻译的代码

对于在天朝以内的用户,西瓜君个人建议是使用百度翻译的代码,因为除了支持国货之外,还有一个层面就是百度的产品其实非常优秀。其次百度的服务器在国内比微软的坑会稳定一点。

// 自动生成英文别名 - 百度版 
function bymt_slug_auto_translate( $title ) { 
 $wp_http_get = wp_safe_remote_get( 'http://fanyi.baidu.com/v2transapi?from=zh&to=en&transtype=trans&query=' . $title ); 
 if ( emptyempty( $wp_http_get->errors ) ) { 
 if ( ! emptyempty( $wp_http_get['body'] ) ) { 
 $trans_result = json_decode( $wp_http_get['body'], true ); 
 $trans_title = $trans_result['trans_result']['data'][0]['dst']; 
 return $trans_title; 
 } 
 } 
 return; 
} 
add_filter( 'sanitize_title', 'bymt_slug_auto_translate', 1 );

微软翻译的代码

// 自动生成英文别名 - 微软版 
function bymt_slug_auto_translate( $title ) { 
 $wp_http_get = wp_safe_remote_get( 'http://api.microsofttranslator.com/v2/ajax.svc/TranslateArray2?appId=%22TKT68kjRgkUbVtIKst6Vo0Hxnb6g2f0K3tUMyn1gZ7nc*%22&from="zh"&to="en"&options={}&texts=["' . $title . '"]' ); 
 if ( emptyempty( $wp_http_get->errors ) ) { 
 if ( ! emptyempty( $wp_http_get['body'] ) ) { 
 preg_match('/"TranslatedText":"([^"]+)/i', $wp_http_get['body'], $trans_result); 
 $trans_title = $trans_result[1]; 
 return $trans_title; 
 } 
 } 
 return; 
}

【wordpress教程】纯代码实现QQ邮箱发送邮件

很多时候,我们自己博客的邮箱发送的邮件,回因为各种各样的原因,而导致发送出去的邮件直接被对方的邮箱加入黑屏名单,可是我们发送的邮件无非就是为了让访客看到,从而给自己带来流量的作用。对于已经加入垃圾箱的邮件被查看的几率我想几乎已经接近于零了,毕竟没在垃圾箱的时候,查看的可能性都不到百分之十,何况是已经掉进了垃圾箱。

今天西瓜君教大家利用代码利用QQ邮箱实现WordPress收发邮件

方法听蛮老套的,但是这个功能我觉得适合每一个WordPress用户,毕竟使用QQ邮箱发送邮件可以节省一点服务器的压力。然后配合WordPress邮件美化代码,就可以实现类似于我们平时收到的邮件那种有效果,并且不会直接丢进垃圾箱。

实现的方式很简单,只需要将以下代码复制以后,粘贴到你主题的functions文件当中即可

add_action('phpmailer_init', 'mail_smtp');
function mail_smtp( $phpmailer ) {
$phpmailer->FromName = '虫子君'; //发件人名称
$phpmailer->Host = 'smtp.qq.com'; //修改为你使用的邮箱SMTP服务器
$phpmailer->Port = 465; //SMTP端口
$phpmailer->Username = 'csccsr@qq.com'; //邮箱账户
$phpmailer->Password = '*********'; //邮箱密码(此处填写QQ邮箱生成的授权码)
$phpmailer->From = 'csccsr@qq.com'; //收件邮箱账户
$phpmailer->SMTPAuth = true;
$phpmailer->SMTPSecure = 'ssl'; //tls or ssl (port=25时->留空,465时->ssl)
$phpmailer->IsSMTP();
}

说明:这里需要说明的一点是,以上的中文标记的部分,记得替换成您自己的信息,其中邮箱密码,并非值得是独立密码,而是邮箱生成的验证密码。

【wordpress教程】给自己博客评论框添加背景图片,让评论框不再单调

vieu主题修改方法

首先由于主题不同,所以我的CSS和大家并不一样!因此,我们需要找到评论框所在CSS!我使用的是vieu主题版本,用这个版本的可以直接添加代码使用,其它主题可以参考这个方法。
最常见的就是审查元素功能,鼠标右键查看元素或者直接按快捷键f12即可。

然后打开你的CSS修改下就好啦,最后保存下或者直接替换图片就是最好的方法。

其它修改方法

方法很简单一学就会,是通过CSS修改添加的:因此,我们需要找到评论框所在CSS!用这个版本的可以直接添加自定义样式代码使用,其它主题可以参考这个方法。

然后打开您的主题style.css文件,找到#comment,插入如下代码:
background-image:url(images/commentbg.png);
background-repeat:no-repeat;
background-position:center center;

完整代码

/**评论框添加背景图片**/
#comment {
    background: #fff;
    width: 100%;
    margin: 0 10px 10px 0;
    padding: 5px;
    border: 1px solid #ddd;
    border-radius: 20px;
    -webkit-appearance: none;
    background-image:url(wp-content/wp-content/themes/begin/images/commentbg.png);/*评论框背景图片*/
    background-repeat:no-repeat;
    background-position:center center;
}
/**结束**/

代码作用

其中background-image,表示背景图片的地址,可以是绝对地址,也可以是相对地址(相对于style.css文件来说的,以上代码是相对地址,也就是主题的images;绝对地址就要包含域名的完整路径)
background-repeat,该属性表示是否重复,no-repeat为不重复,默认不重复。重复样式如下图,满满的一大屏。


background-position,该属性用来控制图片在评论框中的位置,前一个参数表示左右位,后一个参数表示上下位。
最后保存,ftp上传style.css到主题文件夹覆盖就可以了!当然还有不要忘了上传背景图片哦!

背景图片